1.8
Getting Started

There are various ways to get started with EGT depending on your requirements. If you are building EGT on a PC, you can start by just fetching the source of the EGT project. If you are developing for and deploying to a target board, the easiest way to work with EGT is part of a buildroot or Yocto Project SDK which already includes a cross compiler and all of the necessary dependencies and tools.

See Eclipse Development Environment Setup for how to setup the Eclipse IDE for host or cross compiling.

If you are planning to work on EGT itself, see the CONTRIBUTING.md file in the root of the EGT repository.

Fetching Source

Source code for EGT is available through the git revision control system. You would need it installed on your system:

sudo apt install git

Fetch the source:

git clone --recursive https://github.com/linux4sam/egt.git
Note
Note the --recursive option. This option is necessary to initialize any git submodules in the project. If you forget to do this, autogen.sh will do it for you.

Building

EGT is tested on Ubuntu 18.04, but is also known to work on Ubuntu 16.04 as well as other distributions like Debian and Fedora. These instructions should be adjusted accordingly.

EGT uses the GNU Autotools, like automake, for building on Linux platforms.

To build for a PC, first install the required dependencies for building EGT:

sudo apt install build-essential automake autoconf libtool pkg-config \
libdrm-dev libinput-dev libcairo-dev libjpeg-dev libmagic-dev gettext

Optional, but recommended, EGT Dependencies include:

sudo apt install librsvg2-dev liblua5.3-dev libcurl4-openssl-dev \
libxkbcommon-dev xkb-data
sudo apt install libgstreamer1.0-dev libgstreamer-plugins-base1.0-dev
sudo apt install libplplot-dev plplot-driver-cairo
sudo apt install libasound2-dev libsndfile1-dev
Note
On Ubuntu 16.04 the package plplot12-driver-cairo should be used instead of plplot-driver-cairo.

Then, clone the source and initialize Autotools. Typically Autotools only needs to be initialized once and it will automatically pick up most changes. However, when making changes to the configure scripts, the environment, or makefiles re-running autogen.sh, or more simply autoreconf -fvi, is necessary.

git clone --recursive https://github.com/linux4sam/egt.git
cd egt
./autogen.sh

Then, configure and build.

./configure
make

You can also build out of the source tree. This is useful, for example, to use the same code tree with different parameters and environments to configure the build in as many different build directories as you wish. It also avoids polluting the source tree with build artifacts.

mkdir -p build/host
cd build/host
../../configure
make

Then, run an example.

cd examples/basic
./basic

EGT also supports cross compilation for target systems. If you already have a cross compiler available with dependent libraries available, add it to your PATH and follow the standard instructions.

Note
When adding cross compilation paths to the PATH environment variable, it should come before any existing system paths.
./autogen.sh
./configure --prefix=/nfsroot/root/egt/ --host=arm-buildroot-linux-gnueabi
make

Configure Options

You can run "./configure --help" to see more options. Some non-standard options are listed here, but not all.

--enable-code-coverage
Whether to enable code coverage support
--enable-sanitize
turn on sanitize analysis tools
--enable-debug
enable debugging support [default=yes]
--enable-gcov
turn on code coverage analysis tools
--enable-profile
turn on profiling tools
--disable-icons
do not install icons [default=no]
--enable-examples
build examples [default=yes]
--disable-virtualkeyboard
include support for virtualkeyboard [default=yes]
--enable-lto
enable gcc's LTO [default=no]
--enable-lua-bindings
enable lua bindings (default: no)
--enable-simd
build with simd support [default=no]
--enable-snippets
build snippets examples [default=no]

Cross Compiling With Buildroot

EGT is included as a package as part of the buildroot-external-microchip project. Start building a target filesystem for a board, follow the instructions found in that project's README.

See the configs directory in the buildroot-external-microchip project for a graphics defconfig for your processor and board.

Once the target filesystem is done, run

make sdk

Extract the SDK. Then:

cd path_to_the_extracted_buildroot_sdk
./relocate-sdk.sh
source environment-setup
cd path_to_egt_folder
./autogen.sh
./configure $CONFIGURE_FLAGS --prefix=path_to_install_folder --exec-prefix=path_to_install_folder
make -j $(nproc)
make install

All files necessary for the target (applications, library, includes and shared resources) are installed in path_to_install_folder.

Cross Compiling With Yocto

EGT is included as a package as part of the meta-atmel Yocto layer project. To build a complete SDK and target filesystem for a board, follow the instructions found in that project's README.

Run the SDK script to install it. Then:

cd path_to_egt_folder
source /opt/poky-atmel/4.0.3/environment-setup-armv5e-poky-linux-gnueabi
./autogen.sh
./configure $CONFIGURE_FLAGS --prefix=path_to_install_folder
make -j $(nproc)
make install

All files necessary for the target (applications, library, includes and shared resources) are installed in path_to_install_folder.

Building for Windows

The EGT examples can be built for 32 bit or 64 bit Windows on Linux using the mxe project.

For example, to build 64 bit static binaries, this can be done with the x86_64-w64-mingw32.static target.

git clone https://github.com/mxe/mxe.git
cd mxe
make MXE_TARGETS=x86_64-w64-mingw32.static cc libpng jpeg freetype cairo libsndfile sdl2 librsvg
... wait ...
export PATH=`pwd`/usr/bin:$PATH
cd ~/egt
./configure --host=i686-w64-mingw32.static
make

First Application

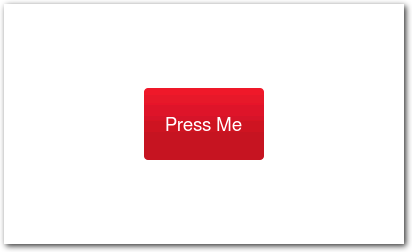
The examples folder of the EGT project contains various examples. This is the basic example which shows the minimum necessary to create a window with a button on it.

The include file <egt/ui> contains most basic functionality needed.

#include <egt/ui>
int main(int argc, char** argv)
{
egt::Application app(argc, argv);
egt::Button button(window, "Press Me");
egt::center(button);
window.show();
return app.run();
}
Application definition.
Definition: app.h:49
Basic button control.
Definition: button.h:65
Top level Window.
Definition: window.h:328
void show() override
Show the Widget.
T & center(T &widget)
Helper to set alignment of a widget.
Definition: widgetflags.h:411

Basic Example

If you want to use a UI file instead.

#include <cxxopts.hpp>
#include <egt/ui>
#include <egt/uiloader.h>
#include <iostream>
int main(int argc, char** argv)
{
egt::Application app(argc, argv);
#ifdef EXAMPLEDATA
egt::add_search_path(EXAMPLEDATA);
#endif
cxxopts::Options options(argv[0], "load ui xml");
options.add_options()
("h,help", "Show help")
("i,input", "Input file", cxxopts::value<std::string>()->default_value("file:ui.xml"));
auto args = options.parse(argc, argv);
if (args.count("help"))
{
std::cout << options.help() << std::endl;
return 0;
}
egt::experimental::UiLoader loader;
auto window = loader.load(args["input"].as<std::string>());
window->on_show([&]()
{
for (const auto& w : app.windows())
{
#ifdef EGT_HAS_VIDEO
if (w->type() == "VideoWindow")
{
egt::VideoWindow* vwin = dynamic_cast<egt::VideoWindow*>(w);
vwin->play();
}
#endif
#ifdef EGT_HAS_CAMERA
if (w->type() == "CameraWindow")
{
egt::CameraWindow* cwin = dynamic_cast<egt::CameraWindow*>(w);
cwin->start();
}
#endif
}
});
window->show();
return app.run();
}
A CameraWindow is a widget to capture image feed from the camera sensor and render it on screen using...
Definition: camera.h:39
bool start()
Initialize camera pipeline to capture image feed from the camera sensor and render to Window.
A VideoWindow is a widget to decode video and render it to a screen.
Definition: video.h:48
bool play()
Play the video.
Signal on_show
Invoked when a widget is shown.
Definition: widget.h:160
EGT_API void add_search_path(const std::string &path)
Add a search path for files.

Using this Documentation Offline or With Other Development Tools

This documentation is also available in the form of a docset that can be read and searched using a tool like Dash (macOS) and Zeal (macOS/Windows/Linux). In turn, the documentation can be integrated into an IDE or tools like Atom/VSCode for an indexed and easily searchable API reference. These tools also provide a method for automatically or manually updating to the latest EGT documentation.

Once you have one of these tools installed, the docset feed URL is located at:

https://linux4sam.github.io/egt-docs/docset/EGT.xml

Note
To install Zeal, see the official documentation to download and installing. Specifically, on Ubuntu, it is recommended to get the latest version with their PPA.
sudo add-apt-repository ppa:zeal-developers/ppa
sudo apt update
sudo apt install zeal